
In this post, I will show you how to format an Excel date column from integer to date using Power Automate. For this example, the flow is manually triggered, but it can be created using any other trigger, such as a schedule or an automated trigger from any connector.
Scenario:
When entering data in a Microsoft Excel file that contains a date column, Excel stores dates and times as a number known as the Date Serial Number. MVP Mynda Treacy has an excellent blog post about Excel Date and Time. You can read it here.
Solution:
To demonstrate how the conversion works, I created a flow to read all the rows from a sample Excel file that contains a Date column. Please follow the steps below:
- Go to http://flow.microsoft.com.
- Click on Create on the left menu and select Instant cloud flow.

- In the Build an instant cloud flow screen, enter the Flow name in the field, select Manually trigger a flow from the Choose how to trigger this flow *, and then click on Create.

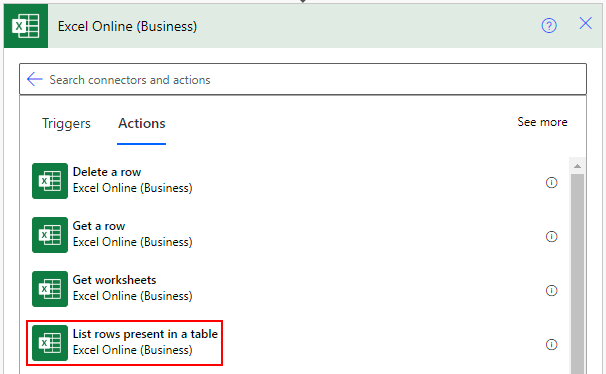
- Once in the flow editor, click on the + New step button and select the Excel Online (Business) connector. Then from the list of Excel actions, select List rows present in a table.
- In the List rows present in a table action, set the *Location, *Document Library, *File and *Table properties.
Note: there are additional settings in the action that can be set, but I won’t go into details on this post.

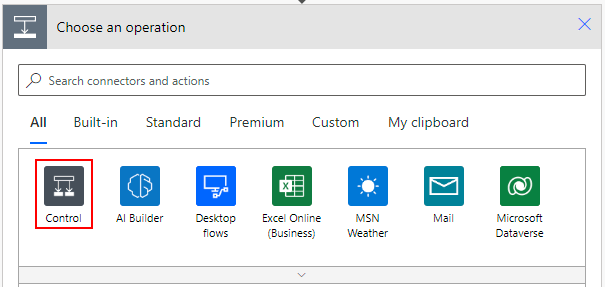
- Since the Excel action will retrieve multiple rows, an Apply to each action must be added so the flow can loop through each row. You do this by clicking on the + New step button, select Control and then select Apply to each.

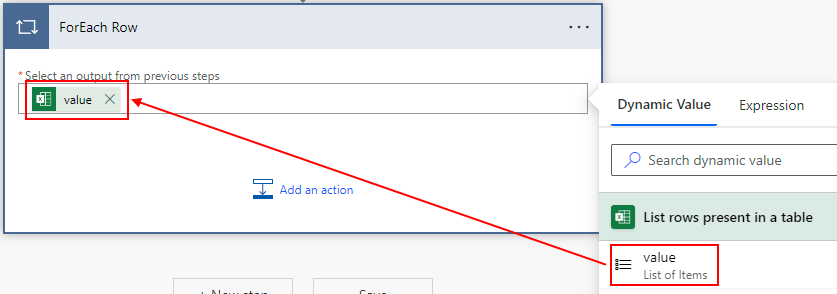
- Rename the Apply to each action to ForEach Row. This will help simplify the use of the loop in the expression that will be used for the conversion.
- Click on the *Select an output from previous steps and select value from the List rows present in a table action in the Dynamic Value window.
- Inside the ForEach Row action, click on Add an action and search for and select Compose. For the purpose of this post, I will rename the Compose action to Formatted Excel Date.

- Click on the *Inputs field and go to the Expression tab. We will use the addDays() function to convert the date.
- Enter the expression as follows:
addDays('1899-12-30', int(items('ForEach_Row')?['Hired Date']), 'MM-dd-yyyy')

- This is what the expression above is doing:
- The first parameter in the addDays() function is the timestamp, which is the string that contains the timestamp. In this case the value is 1899-12-30. If you didn’t read the post I linked above, please read it so you can understand why the timestamp used here is 1899-12-30.
- The second parameter is the number of days to add. Even though Excel displays the date as integer, the cell is formatted as a string, hence the use of the int() function to convert the string to integer.
- The third and last parameter is the format. For this post, we will format the date as MM-dd-yyyy (e.g. 03-31-2023)
- Once you have the expression in place, save the flow and run it.
Please give this a try and let me know in the comments section below. Thank you for reading and have a wonderful day 😀
Photo by Towfiqu barbhuiya on Unsplash
