
Have you ever wondered have to add new values to a SharePoint Choice column without having to go into the settings of the respective list? Have you thought about letting users take care of this, but you are not keen about them messing around in the list settings? Well, I present you a way you can do it using Power Automate. For this example, I will use a manually triggered flow, but this can be enhanced with a Power Apps. More on this on a different post. Let’s get started with the flow, shall we?
To create the flow, please the follow the steps below:
- Go to https://flow.microsoft.com
- On the left menu, click on Create and then click on Instant cloud flow.

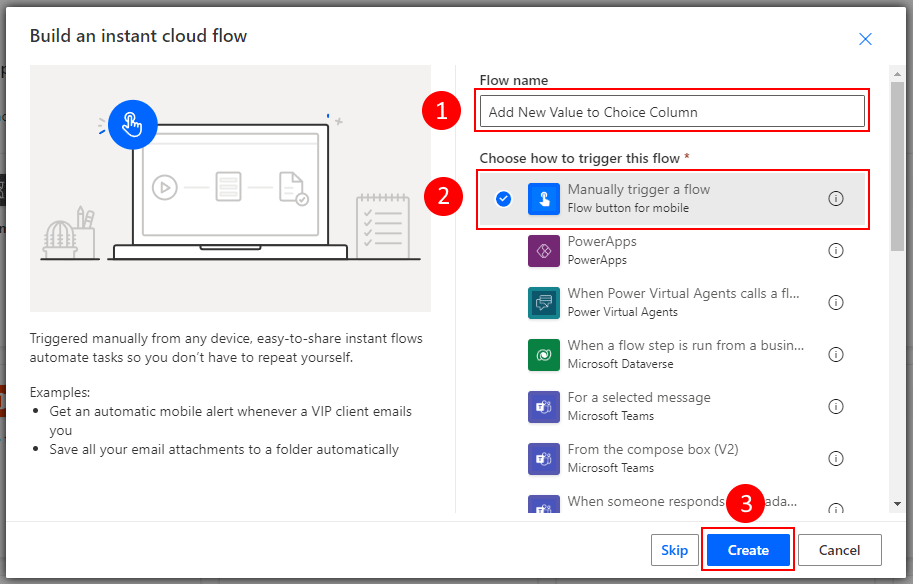
- In the Build an instant cloud flow screen, enter the name of your flow, select the Manually trigger a flow trigger, and then click on Create.
- In the flow editor, click on + Add an input in the trigger and select Text. Rename Input to Choice Value.

- In the flow editor, click on + New step. Then search for and select Initialize variable. Rename the action to Initialize varChoices. Then set the Name to varChoices and the Type to Array.

- Click on + New step. Then search for HTTP and select the Send an HTTP request to SharePoint action. Rename the action to Get Choice Column Values.

- For the Site Address property, select the desired site and set the Method property to GET. Once that’s done, set the Uri property to _api/web/lists/getbytitle(‘Documents’)/Fields/getbytitle(‘Customer’)?$select=Choices. Finally, set the Headers property as shown in the table below.

Note: the Documents value between parentheses in the getbytitle endpoint is the name of the list that contains the Choice field that will be updated. Additionally, the Customer value between parentheses in the /Fields/getbytitle endpoint is the name of the Choice field that will be updated.
| Key | Value |
|---|---|
| accept | application/json;odata=nometadata |
- At this point, the flow must be run so you can copy the output from the previous action and use in the next action you will add.
- When the flow runs, open the last run from the history, expand the Get Choice Column Values action and copy the output from the body.

- Click on Edit on the top right and then click on + New step. Then search for and select Parse JSON. Set the Content to the body output from the Get Choice Column Values action. Then for the Schema, click on Generate from sample and then paste the output you copied from the body of the Get Choice Column Values action. Click on Done.
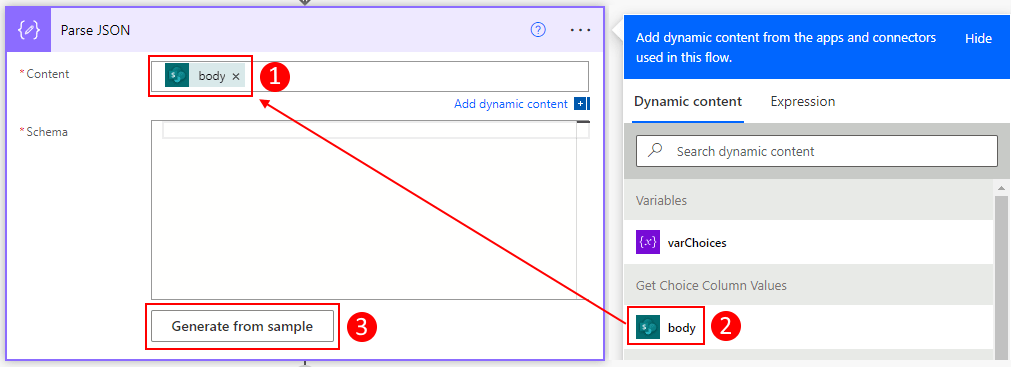

Note: you might wonder what the Parse JSON action is for. I use it to have the output of many actions available to be selected in the Dynamic content window. These actions only allow you to use properties from their outputs by using expressions.
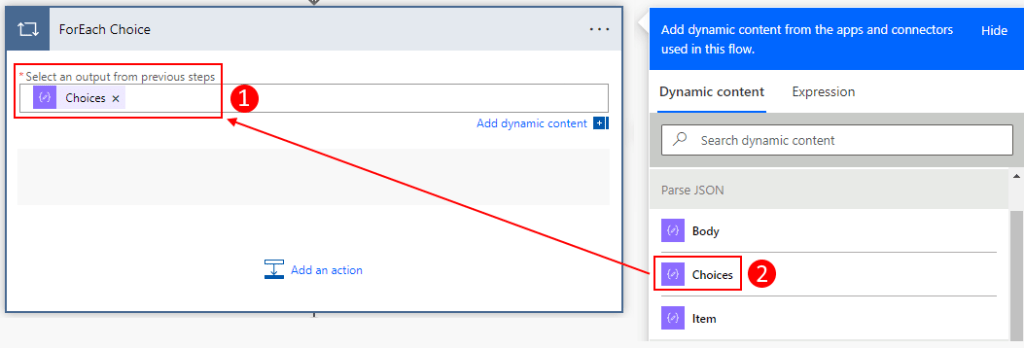
- Click on + New step. Then search for and select Apply to each and rename it to ForEach Choice. Set the Select an output from previous steps to the Choices property from the Parse JSON action in the Dynamic content window.
- Click on Add an action inside the ForEach Column action. Then search for append and select the Append to array variable action, and rename it to Append Existing Values. From the Name drop-down, select varChoices and for the Value, go to the Expression tab and enter the following expression:
items('ForEach_Choice')

- Click on + New step. Then search for append and select the Append to array variable action, and rename it to Append New Value. From the Name drop-down, select varChoices and for the Value, select the Choice Value from the Dynamic content window.

- Click on + New step. Then search for and select Compose action, and rename it to Choices. Set the Inputs to the varChoices variable.

- Click on + New step. Then search for HTTP and select the Send an HTTP request to SharePoint action. Rename the action to Add New Choice Value.

- For the Site Address property, select the desired set and set the Method property to GET. Once that’s done, set the Uri property to _api/web/lists/getbytitle(‘Documents’)/Fields/getbytitle(‘Customer’)?$select=Choices. Finally, set the Headers property as shown in the table below:
| Key | Value |
|---|---|
| accept | application/json;odata=verbose |
| content-type | application/json;odata=verbose |
| X-HTTP-Method | PATCH |
| IF-MATCH | * |
- Finally, set the Body property to the JSON outlined below. Once you paste it, put the mouse cursor to the right of ‘results’: and select the Ouputs from the Choices action in the Dynamic window. Click on Save. The flow is now ready for testing.
Note: I will have an explanation as to what each line means in the JSON.
{
    '__metadata':{
        'type': 'SP.FieldChoice'
    },
    'Choices': {
        '__metadata':{
            'type': 'Collection(Edm.String)'
        },
        'results':
    }
}

JSON Notes:
The __metadata is used to indicate the property that will be used for the column, which in this case is the SP.FielChoice value in the type property. SP.FielChoice indicates the type of column that will be updated. The Choices indicates the values that will be entered in the form of an array. For this one, you can see the type property is set to Collection(Edm.String), and a collection is an array. Finally, the results property is used to use all the values from the array that will be used to update the Choices.
Please give this a try and let me know in the comments section below. Thank you for reading and have a wonderful day 😀
Photo by Tina Floersch on Unsplash

HI Fausto
This is an excellent post!
Just one question where would you put a check in place for duplicate values that may already be in the Sharepoint Choice Field
Regards Gary
LikeLike
Hi Gary,
You can add a Condition action inside the ForEach Choice action. You have check if the new value is NOT found in the output of the Parse JSON action. If the condition is true, then have the flow execute the Append Existing Values action inside the Yes branch. I hope this helps.
LikeLike
It worked very well. Thanks!
If I would like to have the new Choice Column alphabetically sorted, how can I do this? It tried with the function sort, but I just get the “output” of the compose step sorted, not what is written back to SharePoint.
LikeLike
Hi Marc,
I just tried this in the flow I used for the blog post: To the Choice action, I added the expression sort(variables(‘varChoices’)), and the values in the Choice column were sorted from A-Z.
LikeLike